Step-by-Step Guide to Drawing the Symbolic Lotus Flower
This work has been verified by our teacher: 20.03.2026 at 16:10
Type of homework: Essay Writing
Added: 19.03.2026 at 13:42
Summary:
Discover how to draw the symbolic lotus flower step-by-step while learning its cultural significance and artistic details in this guided homework solution. 🌸
Lotus Flower Drawing: An Artistic Journey Rooted in Indian Culture
The lotus flower, or *kamal* as it is known in Hindi, holds a unique and revered place in the heart of Indian culture and art. It is not only the official national flower of our country but also carries deep symbolic meanings. The lotus is celebrated in numerous holy scriptures, from the Vedas to the Bhagavad Gita, embodying purity, spiritual awakening, and resilience—qualities admired across generations. The flower’s ability to remain pristine and untouched amidst muddy waters is a profound metaphor, inspiring poets, artists, and spiritual thinkers alike.
This essay aims to guide students through the process of drawing the lotus flower, focusing on both technical skill and cultural appreciation. By breaking down each stage, from observing the flower’s structure to adding delicate details, I hope to encourage aspiring artists to approach their work with patience, curiosity and respect for tradition. Drawing the lotus is not only an exercise in observation and technique—it can also become a meditative and joyful journey, echoing the flower’s own quiet elegance.
---
Understanding the Lotus Flower: Structure, Types, and Symbolism
Before pencil ever touches the page, it is essential to intimately know the subject. The lotus, or Nelumbo nucifera, is immediately recognisable by its large, layered petals and iconic bowl-shaped centre. Most commonly, Indian ponds are dotted with two main varieties: the pink lotus and the relatively rarer white lotus. Each presents unique visual characteristics, influencing the artist’s approach.Anatomy of the Lotus
The core parts to focus on when drawing are the petals, the central seed pod, the soft yet sturdy stem, and the broad, nearly circular leaves floating upon the water’s surface. The petals, numbering anywhere between twelve to twenty or more, overlap in symmetrical layers, gently forming a cup. Each petal is smooth, rounded, and tapers to a gentle point—never too sharp or jagged.At the heart of the flower sits the seed pod, sometimes referred to as the “karand,” which contains small circular indents. Thin, delicate filaments surround it: the stamens, often depicted with yellow dots or tiny lines. The stem is thick yet appears flexible, giving grace to the entire form.
Visual Qualities for Drawing
For artists, the graceful balance and symmetry of the lotus pose both a challenge and an opportunity. Though every blossom is unique, careful observation reveals a harmonious pattern. To capture this natural beauty, students are advised to begin by carefully examining real lotus flowers or, if unavailable, clear photographs. Numerous Indian school textbooks, like “Art and Craft” by NBT or “Pictorial Flora of India,” include helpful references. Visiting a local lake or temple pond for a direct study, as Rabindranath Tagore often did for inspiration in his paintings, allows one to sketch the subtleties of light, petal curves, and shadow.---
Preparation: Tools, Paper, and Workspace
An artist’s tool kit need not be elaborate, especially for beginners. Indian art classrooms often recommend starting with an HB pencil for construction lines and 2B or 4B pencils for deeper outlines and shading. A good eraser, a reliable sharpener, and plain sketch paper or a drawing pad are also necessary. For those looking to add vibrance, colour pencils, crayons, or watercolours can be introduced after mastering the sketch.The workspace plays an equally important role. Choose a spot with natural daylight, perhaps by a window, as it helps discern the subtleties in shadows and highlights. If drawing under a bulb, ensure the light is bright but diffused, not harsh. Keep your paper at a comfortable angle, and sit upright—many Indian art teachers advise using a desk with space for free arm movement to avoid cramps and encourage flow.
For pencil sketches, smooth cartridge paper is preferred as it allows finer shading. Rougher paper holds colour better for crayons or watercolour washes. Beginners may use A4 or A5 sheets, which offer a manageable space for focused practice without feeling overwhelming.
---
Step-by-Step Lotus Drawing
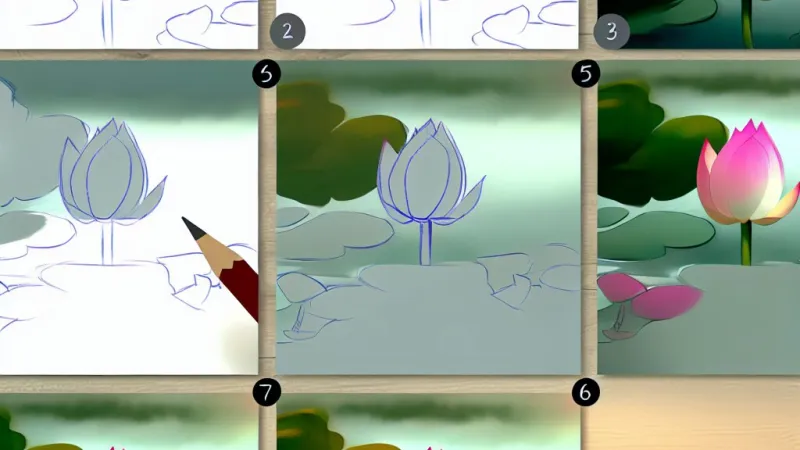
Step 1: Outlining the Core Shape
Begin with a soft, light oval or circle at the centre—this will serve as the guide for both the seed pod and the layout of the petals. Around this, sketch gentle lines radiating outward to mark where each petal will rest, similar to dividing a sweet lime (mosambi) into segments. These construction lines are not part of the final drawing and should be faint.Step 2: Crafting the Petals
Using the guidelines, gradually draw petals one by one, starting from the centre outward. Overlap the foreground petals slightly to create a sense of layering. Each petal should arc upward and outward, with a smooth body and a gentle point at the tip—think of tracing the edges of a butter knife. It is important to keep the size of the petals balanced around the centre to maintain realism, echoing the *mandala* style seen in rangoli patterns during festivals like Diwali.Step 3: Drawing the Flower’s Centre
Inside the central circle, sketch the seed pod—a gentle dome shape, dotted with tiny circular impressions. For added delicacy, lightly indicate the stamens around the pod, using short lines or dots.Step 4: Adding Leaves and Stem
Extending below the flower, draw a curved stem, slightly thicker at the bottom. To the sides or beneath, include at least one large leaf—broad, almost round, but slightly rippled at the edges. The leaf surface can have faint veins, traced in soft, branching lines, reminiscent of the patterns seen in Madhubani paintings from Bihar.Step 5: Refining and Cleaning
Erase all extra guiding lines carefully, using a clean eraser to avoid smudging. Strengthen the outer lines of the petals and leaves where required, but avoid making every outline too dark—the beauty of the lotus is in its subtlety.Step 6: Detailing and Shading
To give your lotus depth and life, add shading to the bases of the petals and where they overlap. Imagine a source of light—say, sunlight from above left—and leave tops of petals lighter while darkening areas beneath overlapped petals and the base of the leaves. Use a soft pencil and gentle strokes; press harder for darker areas and lighter for soft highlights. Practice controlling your pencil just like a calligrapher handles the brush during a Kalighat painting session.---
Enhancing Your Drawing: Creative and Mindful Approaches
Patience and Improvement
Drawing a lotus is more than following steps—it’s about developing observation and perseverance. Ancient Indian artists, whether working on Mughal miniatures or schoolchildren sketching a diya and lotus during Saraswati Puja, repeat their studies to improve touch and feel. Be patient, and allow yourself to make mistakes; every attempt offers new learnings.Experimentation
Once comfortable, try playing with styles. Combine realism with stylised lines or blend your own patterns into petals, drawing inspiration from temple frescoes or Gond tribal motifs. Add bold outlines with ink, or use colour pencils to mimic the rich hues seen in lotus ponds of Kashmir or the Ganga ghats.Spiritual and Cultural Touches
To heighten the meditative quality, consider adding small rangoli or mandala designs around the flower. Many artists use the act of drawing a lotus as a form of meditation, mirroring the flower’s association with peace and focus in Buddhist and Hindu philosophies.Avoiding Common Mistakes
Beginner artists in India commonly make outlines too harsh or erase too often, leading to smudgy pages. Always keep hands clean, handle the paper by edges, and use a light touch. Pay close attention to the order of petals; getting this right adds natural beauty and flow.---
Expanding Your Lotus Art
Exploring Perspectives
Try drawing the lotus from the side, showing fewer petals and more of the stem, or sketching unopened buds like those often offered in temple rituals. Compose scenes with multiple lotuses, or position your flower floating on water, creating ripples using gentle pencil strokes, as illustrated in Amar Chitra Katha comics.Integrating into Larger Artworks
Lotus motifs enliven rangolis, greeting cards, and festive banners. After mastering the basics, introduce digital tools—scan your sketch, colour it using software, and create posters for school exhibitions or Independence Day celebrations.From Lotus to Botanical Art
The discipline acquired in studying the lotus is easily applied to other flowers like jasmine (*mogra*) or marigold (*genda*). This practice sharpens your understanding of form, proportion, and light—essentials for any aspiring botanical artist.---
Conclusion
Drawing the lotus flower is both an artistic and philosophical exercise. By observing carefully, working step by step, and embracing creativity, anyone can master its form. The process—like the journey of the lotus from mud to bloom—teaches patience, persistence, and the joy found in attention to beauty.India’s connection to the lotus is deep-rooted, reflected not just in art but in our collective consciousness. As you continue practising and experimenting, remember that each drawing brings you closer to both artistic skill and inner calm. In the chaotic rhythm of daily life, sitting quietly with pencil and paper, drawing the lotus can be a path to mindfulness and self-discovery.
---
Appendix: Suggested Exercises
1. Draw a single petal in different sizes and angles, from memory. 2. Set a timer and complete a lotus sketch in ten minutes. 3. Try shading only with the side of the pencil for softer gradients.For further learning, reference art books in your school library or online channels where Indian artists demonstrate stepwise drawings, such as “Kiran Fine Art” or “Art with Priyanka.” Remember, every stroke adds to your progress—so keep drawing, keep discovering!
Rate:
Log in to rate the work.
Log in